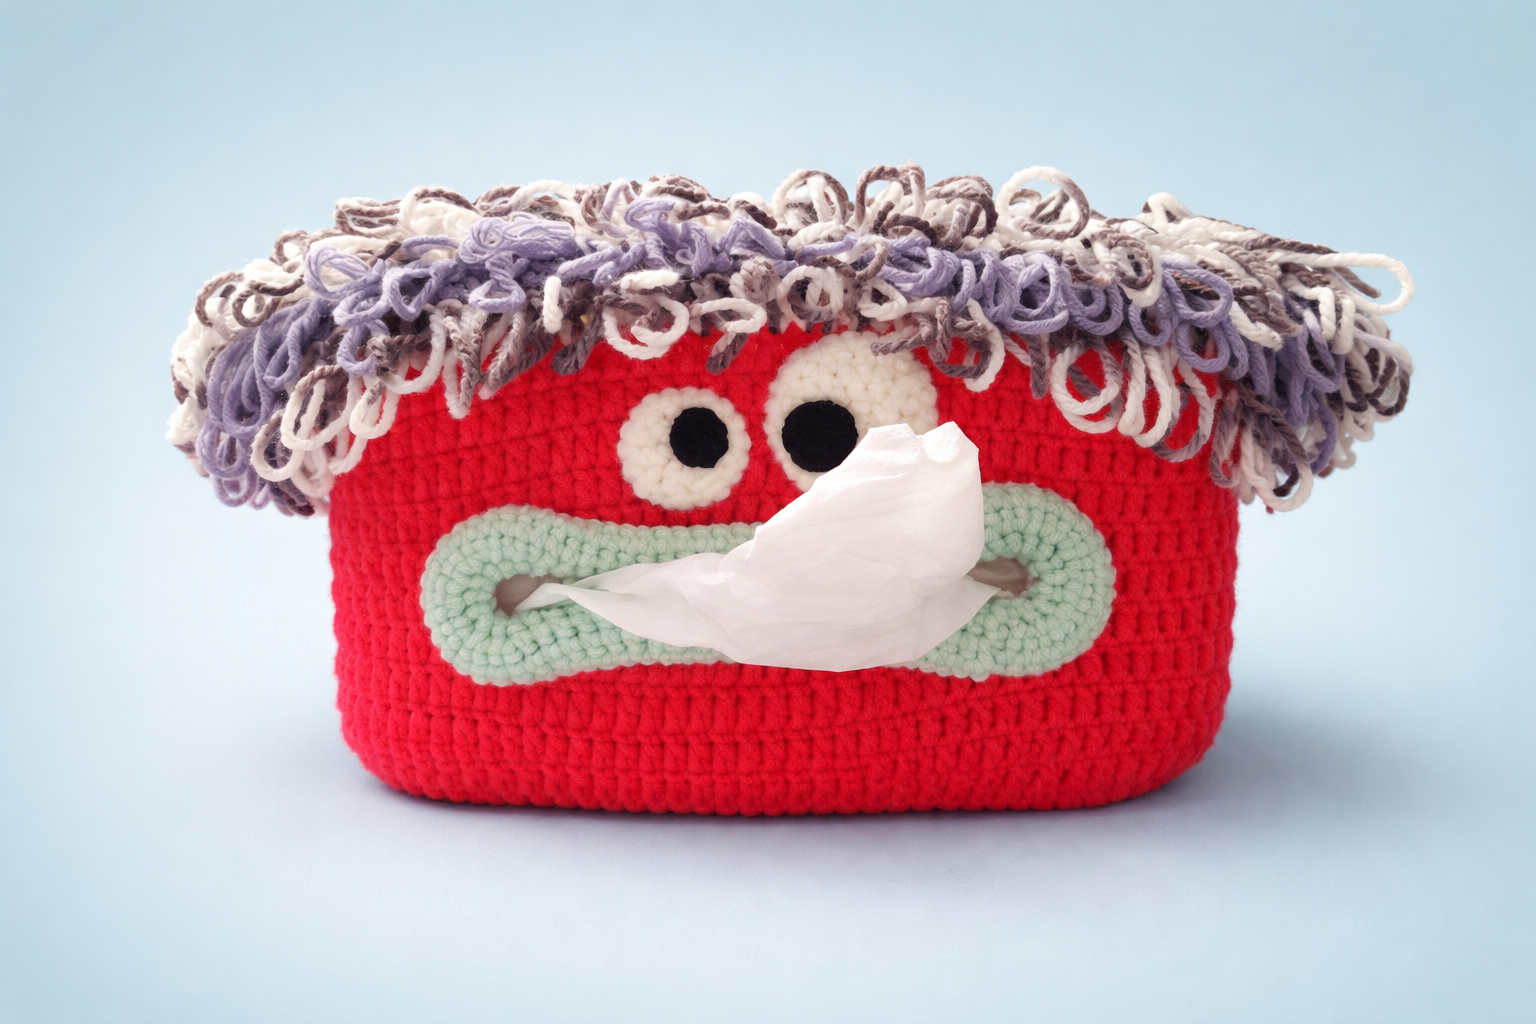
addition to your home décor! This adorable wide-mouth design turns an ordinary tissue box into a cute little character that will make everyone smile.
It’s ideal for living rooms, offices, cafés, or even school desks. The finished size fits a standard 130-sheet tissue pack (approximately 19 cm long and 9 cm wide). Once you add the big lips, fluffy hair, and expressive eyes, this project becomes irresistibly charming!
This is a fun intermediate-level project that includes shaping, increasing, and decorative surface work. Let’s get started!
Materials
-
3.0 mm crochet hook
-
Yarn needle
-
Scissors
-
Worsted weight yarn in:
-
Green (body)
-
Pink (mouth)
-
Black (hair & drawstring)
-
White (eyes)
-
Black (eye centers)
-
-
Standard 130-sheet tissue pack (approx. 19 cm x 9 cm)
Abbreviations (US Terms)
-
ch – chain
-
sl st – slip stitch
-
sc – single crochet
-
dc – double crochet
-
inc – increase (2 stitches in same stitch)
-
MR – magic ring
BASE OF THE TISSUE COVER
Row 1
Ch 35.
Sc in 2nd ch from hook and in each ch across. (34 sc)
Ch 1, turn.
Row 2
Sc in each stitch across. (34 sc)
Ch 1, turn.
Rows 3–14
Repeat Row 2 until you have 14 rows total.
You now have a rectangle measuring approximately 34 stitches wide and 14 rows tall. This forms the bottom base.
FORMING THE SIDES
Now we will work around the rectangle to build the body upward.
Work evenly around the entire base:
-
34 stitches across one long side
-
13 stitches across short side
-
34 stitches across other long side
-
13 stitches across final short side
Total: 94 stitches
Join with sl st.
BODY OF THE MONSTER
Round 1
Ch 2 (counts as dc).
Dc in each stitch around. (94 dc total)
Join with sl st.
Rounds 2–4
Ch 2, dc in each stitch around.
Join with sl st at end of each round.
MOUTH OPENING (ROUND 5)
Ch 2.
Dc in next 20 stitches.
Ch 20 (this forms the mouth opening).
Skip 20 stitches below.
Dc in remaining stitches around.
Join with sl st.
ROUND 6
Dc in next 20 stitches.
Now work 20 dc into the back loops of the 20 chains from the previous round (this reinforces the mouth edge).
Dc in remaining stitches.
Join with sl st.
ROUNDS 7–11
Ch 2, dc in each stitch around.
Join each round.
Check the height by inserting your tissue pack. Add or remove rounds if needed.
Fasten off and weave in ends.
LIPS (Pink Yarn)
Attach pink yarn at one edge of mouth opening.
Round 1
Ch 1.
Sc evenly around mouth opening (including edges and chain space).
Join with sl st.
Round 2
Ch 1.
Sc across top.
At both side edges, increase evenly (2 sc in each edge stitch) to shape lips.
Join.
Round 3
Increase slightly again at corners to round the lip shape.
Rounds 4–5
Sc evenly around to build thickness.
Fasten off and weave in ends.
HAIR (Black Yarn)
Attach black yarn at top edge.
Round 1
Ch 2.
In each stitch:
-
Yarn over, insert hook, pull up loop.
-
Yarn over, pull through 2 loops.
-
Pause, pull up a long loop (adjust length for hair strand).
-
Hold loop and complete dc normally.
Repeat around to create 94 hair strands.
Rounds 2–3
Repeat process for fuller hair effect.
Fasten off and weave in ends.
Tip: Vary loop lengths for a playful messy look!
EYES (Make 2)
White Part
Round 1
MR, 6 sc. Join.
Round 2
Inc in each stitch around. (12 sc)
Round 3
(1 sc, inc) around. (18 sc)
Fasten off.
Black Center
MR, 6 sc.
Join and fasten off.
Sew black center onto white circle.
Sew eyes onto monster body above the mouth.
DRAWSTRING
With black yarn:
Ch 130.
Thread through upper body stitches, weaving between hair sections.
Insert tissue pack and pull string gently to close.
Tie a bow.
Final Result
Your adorable Monster Tissue Box Cover is complete!
Once the tissues are inside, the wide mouth creates a hilarious and cute effect as tissues are pulled out. The hair and big eyes give it personality, and you can customize colors to match your décor.
This project is perfect for gifts, kids’ rooms, cafés, classrooms, or simply to add a bit of joy to your space.
This handmade tissue box cover transforms a simple everyday item into a fun decorative piece. The playful monster design makes it especially appealing for children and creative spaces. Don’t forget to experiment with different yarn colors to create unique personalities!
If you enjoyed this pattern, consider sharing it with fellow crochet lovers 💛