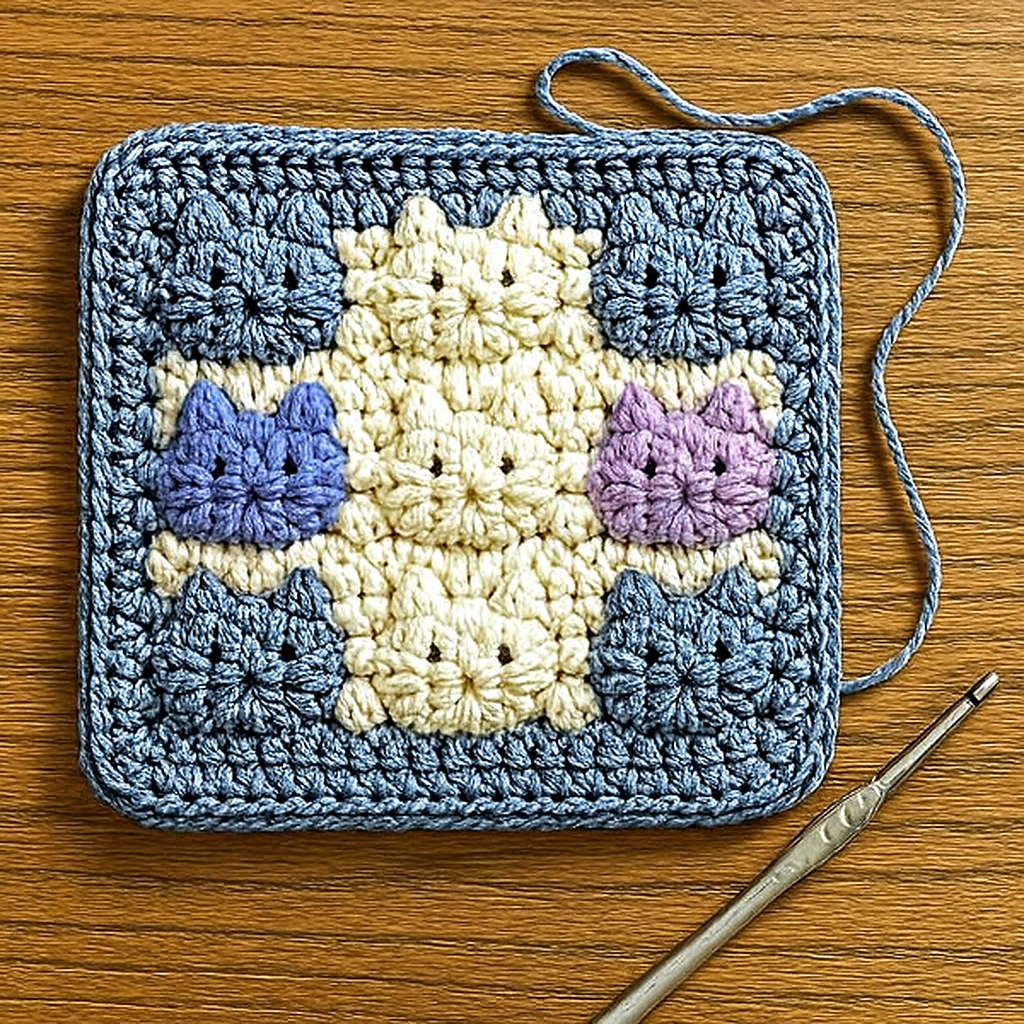
If you love crochet projects that are both fun to make and irresistibly cute, this Cat Granny Square is going to steal your heart. Combining the charm of granny squares with adorable little cat faces, this pattern is perfect for cat lovers and crochet enthusiasts alike. Each square features sweet feline heads, complete with tiny ears and expressive eyes, making it a delightful design for blankets, pillows, bags, or any project that could use a touch of whimsy.
This pattern is also a wonderful way to practice different crochet techniques. You’ll be working puff stitches to form the fluffy cat heads, simple chains and double crochets for the ears, and neat single crochet borders for joining the motifs. While it’s suitable for intermediate crocheters, determined beginners can also give it a try with a bit of patience. Step-by-step, you’ll see the square come to life, with each little cat adding personality to your work.
Skill Level: Intermediate
Finished Size: Approx. 10 x 10 cm (4 x 4 inches) – can vary based on yarn and hook size
Materials
-
Worsted weight yarn in 3 colors (Example: Gray for border cats, White/Cream for center cats, Pink for accent cats)
-
Crochet hook size 4 mm (or size to match yarn)
-
Tapestry needle for sewing ends
-
Scissors
Abbreviations (US Terms)
-
MR – Magic Ring
-
ch – chain
-
sc – single crochet
-
dc – double crochet
-
tr – treble crochet
-
sl st – slip stitch
-
st – stitch
-
sp – space
Special Stitch – Puff Stitch
-
[Yarn over, insert hook into stitch, yarn over, pull up a loop] repeat 4 times (you will have 9 loops on your hook), yarn over and pull through all loops. Chain 1 to close the puff.
Instructions
Step 1 – First Cat Head (Start in Magic Ring)
-
MR, ch 3 (counts as first dc), work 7 puff stitches into the ring (each puff separated by ch 1). You will have 8 puff stitches forming a circle.
-
Join with sl st to top of first puff stitch. Fasten off this color if changing.
Step 2 – Ears
-
Attach yarn in the ch-1 space where you want the ear.
-
First ear: ch 2, 2 dc in the same space, ch 2, sl st in same space.
-
Skip next puff, repeat for second ear.
-
Each cat has 2 ears on top.
Step 3 – Joining Cats
-
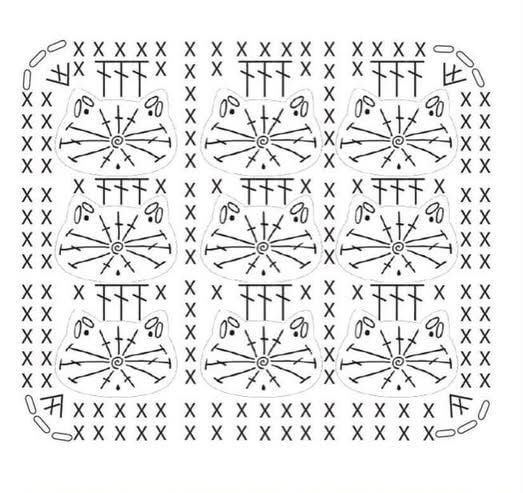
Follow the diagram arrangement: make 9 cat motifs (3 rows of 3).
-
Join-as-you-go method: On the last round of each cat (border in sc), join sides to the neighboring cat by slip stitching into corresponding stitches.
Step 4 – Border
-
With border color (gray in sample), work 1 round of sc all around the joined cats, placing 3 sc in each corner.
-
Next round: dc in each sc around, making 3 dc in each corner.
-
Optional: Repeat more rounds for a larger square.
Step 5 – Eyes (Optional)
-
Using black embroidery thread or thin yarn, stitch 2 small vertical lines on each cat head for eyes.
Tips
-
Keep tension even on puff stitches so all cat heads are uniform.
-
Use contrasting colors to make cats stand out.
-
This square can be used for blankets, pillow covers, or bags.
This pattern is also a wonderful way to practice different crochet techniques. You’ll be working puff stitches to form the fluffy cat heads, simple chains and double crochets for the ears, and neat single crochet borders for joining the motifs. While it’s suitable for intermediate crocheters, determined beginners can also give it a try with a bit of patience. Step-by-step, you’ll see the square come to life, with each little cat adding personality to your work.