Quilting is a timeless craft that allows enthusiasts to create beautiful and meaningful pieces of art. For those looking to express their patriotism and love for their country, the Zig Zag Flag Quilt Pattern is a perfect choice. In this article, we’ll explore the steps to create this stunning quilt, combining creativity with a touch of American spirit.
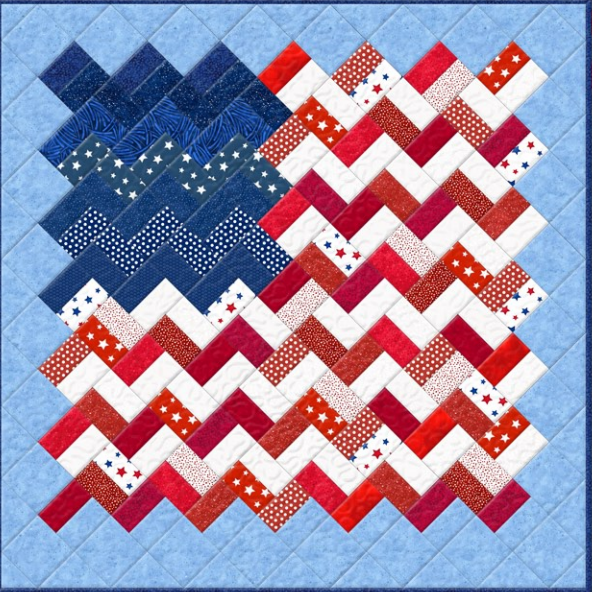
The Zig Zag Flag Quilt Pattern is a striking and creative way to celebrate patriotism through the art of quilting. This unique design allows crafters to express their love for their country while showcasing their quilting skills. The pattern, as the name suggests, features a distinctive zig-zag arrangement reminiscent of the iconic American flag.
Design Concept:
The Zig Zag Flag Quilt Pattern ingeniously interprets the traditional stars and stripes by incorporating a dynamic zig-zag layout. The quilt typically consists of alternating red and white stripes forming the recognizable pattern of the American flag. The addition of a solid blue background with carefully placed white stars adds a touch of authenticity and charm to the design.
Choosing the right materials is crucial for the success of this quilt pattern. Opt for high-quality cotton fabrics in patriotic colors – vibrant reds, crisp whites, and deep blues. The use of quality fabric ensures durability and longevity for your finished quilt. Additionally, consider selecting fabrics with varying patterns or textures to add visual interest to the quilt.
Creating the Zig Zag Pattern:
- Cutting the Fabric: Begin by cutting your fabric into strips. Use the quilting ruler and rotary cutter to ensure precision. You’ll need red and white strips for the stripes and blue strips for the background.
- Creating the Zig Zag Rows: Sew together the strips in a zig-zag pattern, alternating between red and white for the stripes. Ensure that the blue strips are evenly spaced to create the background for the stars.
- Adding the Blue Background: Once the zig-zag rows are complete, add a solid blue strip to the top and bottom of the quilt. This will serve as the background for the stars in the flag.
- Adding Stars: Cut out star shapes from white fabric and strategically place them on the blue background. You can either appliqué the stars or use a star-shaped quilting template for a neat finish.
- Assembling the Quilt Top: Arrange the zig-zag rows and blue background with stars to create the flag design. Sew the pieces together to form the quilt top.
Quilting and Finishing:
- Layering: Place the quilt top on the batting and backing fabric. Baste the layers together using safety pins or temporary fabric adhesive.
- Quilting: Quilt along the zig-zag lines to secure the layers together. You can choose to quilt in straight lines or experiment with different quilting patterns to add texture and dimension.
- Binding: Once the quilting is complete, trim the excess batting and backing fabric. Attach the binding to finish the edges of your Zig Zag Flag Quilt.
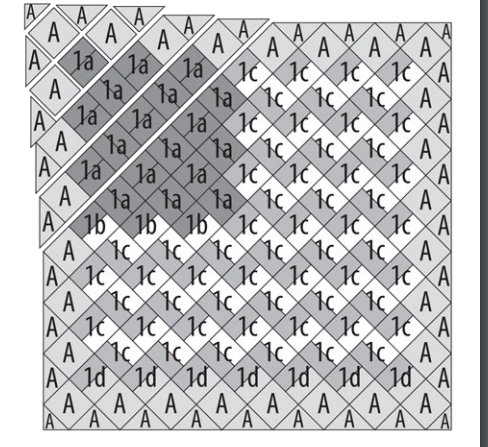
Wall Quilt Layout:
Excited to embark on the Zig Zag Flag Quilt Pattern journey? We’re thrilled to share the creativity and patriotism with you! The PDF pattern is your roadmap to crafting this stunning masterpiece, and the best part is, it’s absolutely free.
The Zig Zag Flag Quilt Pattern is a fantastic way to showcase your patriotism while indulging in the joy of quilting. This project allows for creativity and personalization, making each quilt a unique masterpiece. Whether you’re a seasoned quilter or a beginner, this pattern is a wonderful addition to your repertoire, offering a combination of skill-building and pride in crafting a symbol of national unity. So, gather your materials, start sewing, and watch as your love for quilting and country comes together in a beautiful zig-zag display of American pride.