Instructions:
Notes:
- Ch 2 at beg of rnd does not count as a stitch.
- To change color, work to the last 2 loops on the hook, draw the new color through the last 2 loops, and proceed in the new color.
- Join rounds with a sl st to the top of the first dcfp.
With A, ch 56 (64-72). Join in rnd, making sure not to twist the chain.
Pattern Instructions:
1st rnd:
Ch 2. 1 hdc in each ch around. Join with sl st to the first hdc.
- 56 (64-72) hdc. PM for the beg of rnd.
2nd rnd:
Ch 2. 1 dcfp around the first hdc. *1 dcbp around each of the next 3 hdc. 1 dcfp around the next hdc. Rep from * to the last 3 hdc. 1 dcbp around each of the last 3 hdc. Join.
3rd rnd:
Ch 2. 1 dcfp around the first dcfp. *1 hdc in each of the next 3 sts. 1 dcfp around the next dcfp. Rep from * to the last 3 sts. 1 hdc in each of the last 3 sts. Join.
4th rnd:
Ch 2. 1 dcfp around the first dcfp. *1 dcbp around each of the next 3 sts. 1 dcfp around the next dcfp. Rep from * to the last 3 sts. 1 dcbp around each of the last 3 sts. Join.
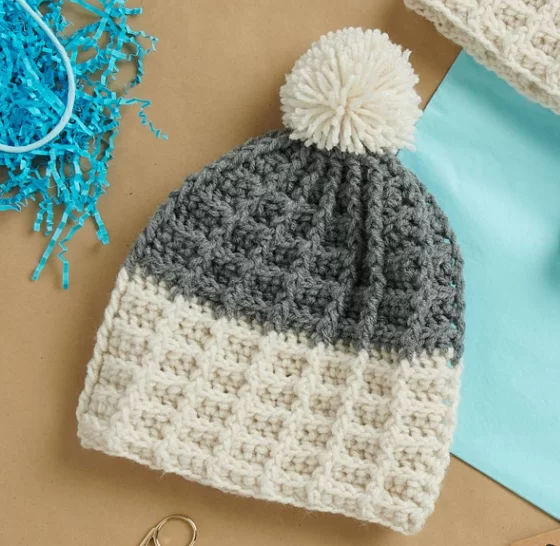
Repeat 3rd and 4th rnds for Waffle Pat until work from beg measures 4″ [10 cm], ending on a 4th rnd.
Join B. Break A.
With B, rep 3rd and 4th rnds for Waffle Pat until work from beg measures approx 5 (6-6½)” [12.5 (15-16.5) cm], ending on a 4th rnd.
Shaping the Top:
1st rnd:
Ch 2. 1 dcfp around the first dcfp. *1 hdc in the next st. Hdc2tog. 1 dcfp around the next dcfp. Rep from * to the last 3 sts. 1 hdc in the next st. Hdc2tog. Join.
2nd rnd:
Ch 2. 1 dcfp around the first dcfp. *1 dcbp around each of the next 2 sts. 1 dcfp around the next dcfp. Rep from * to the last 2 sts. 1 dcbp around each of the last 2 sts. Join.
3rd rnd:
Ch 2. 1 dcfp around the first dcfp. *Hdc2tog. 1 dcfp around the next dcfp. Rep from * to the last 2 sts. Hdc2tog. Join.
4th rnd:
Ch 2. 1 dcfp around the first dcfp. *1 dcbp around the next st. 1 dcfp around the next dcfp. Rep from * to the last st. 1 dcbp around the last st. Join.
5th rnd:
Ch 2. 1 dcfp around the first dcfp. *Skip the next st. 1 dcfp around the next dcfp. Rep from * to the last st. Skip the last st. Join.
6th rnd:
Ch 2. 1 hdc in the same sp as sl st and in each st around. Join.
7th rnd:
Ch 2. (Hdc2tog) 7 (8-9) times. Fasten off, leaving a long end. Draw the end through the rem sts. Pull tightly. Fasten securely.
Pompom:
Wind A around 3 fingers 100 times. Tie tightly in the middle and leave a long end for attaching to the hat. Cut the loops at both ends and trim to a smooth round shape. Sew securely to the top of the hat.
Easy and Delicate Baby Blanket Free Pattern
This cozy and textured waffle stitch crochet hat is perfect for cold weather and makes a fantastic gift. Experiment with different colors and sizes to create a custom look!
