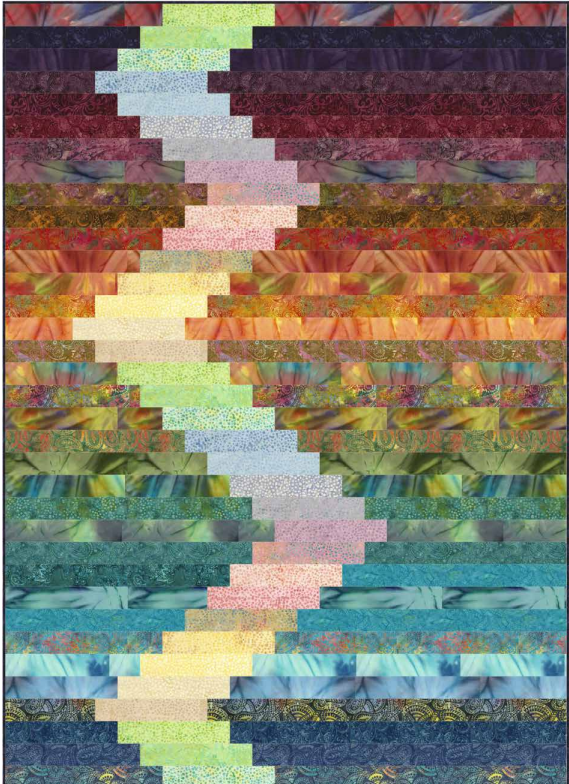
If you love quilts that combine vibrant color with a modern, artistic layout, the Tonga Focus Quilt Pattern – Frequency design is truly a standout. This eye-catching quilt plays with light and dark contrasts, creating a flowing, almost wave-like effect across the entire piece. It’s the perfect project for quilters who enjoy working with pre-cut strips and want a design that feels both structured and creative at the same time.
What makes this quilt especially appealing is how effortlessly it showcases beautiful batik fabrics. The gradual transition between colors gives the quilt a dynamic, almost glowing appearance, making it ideal as a statement piece for your home. Whether draped over a bed or displayed as a wall hanging, this quilt is guaranteed to draw attention.
Another wonderful aspect of this pattern is its versatility. While the original design uses Tonga batik strip sets, you can easily customize it using your favorite color palettes. From soft pastels to bold jewel tones, the layout adapts beautifully, allowing you to create a quilt that reflects your personal style.
Finished Size
-
Approximate size: 50½” x 70½”
This size makes it perfect as a lap quilt, throw, or decorative accent for your living space.
Materials Needed
To create the Tonga Focus Quilt, you will need:
-
1 pack Tonga Treats Strip Jr – Confetti (light fabrics)
-
1 pack Tonga Treats Strip Jr – Sunburst (dark fabrics)
-
1 pack Tonga Treats Strip Jr – Paisley (dark fabrics)
-
5/8 yard fabric for binding
-
3⅓ yards of 44″ backing fabric (or 2⅔ yards of 106″ wide backing)
-
Batting (approx. 59″ x 79″)
Cutting Instructions
This quilt is built entirely from 2½” strips, making it a great jelly roll–friendly project.
-
Separate your strips into light and dark groups
-
Most Confetti fabrics will be light
-
Sunburst and Paisley strips will be dark
Dark Strips
-
Arrange 35 strips in a pleasing color order
-
Cut varying lengths for each row (from approx. 6½” up to 24½”)
-
Keep strips labeled in order to maintain the gradient effect
Light Strips
-
Cut into 2½” x 10½” pieces
-
You will need a total of 35 light strips
-
These will form the center “highlight” of each row
Quilt Assembly
This quilt comes together row by row, creating its signature flowing design.
Step 1 – Build the Rows
-
Sew a light strip between two dark strips for each row
-
Press seams toward the dark fabric
Step 2 – Join the Rows
-
Sew rows together in order (1 through 35)
-
Offset each row slightly to create the diagonal movement
-
Align carefully to maintain the pattern flow
Step 3 – Trim
-
Trim the quilt top to 50½” width for clean edges
Finishing the Quilt
-
Layer your quilt top, batting, and backing
-
Quilt as desired (straight-line quilting works beautifully with this design)
-
Attach binding using 2½” strips
-
Fold to the back and hand-stitch for a polished finish
Design Tips & Color Ideas
One of the most exciting parts of this quilt is choosing your colors. Here are a few ideas to inspire you:
-
🌈 Rainbow Gradient: Follow the original concept for a bold, colorful statement
-
🌊 Ocean Blues: Use teal, aqua, and navy for a calming effect
-
🌸 Soft Pastels: Perfect for a baby quilt or spring décor
-
🔥 Warm Sunset Tones: Reds, oranges, and golds for a dramatic look
The contrast between light and dark strips is key—this is what creates the signature “frequency wave” effect.
Why You’ll Love This Pattern
-
Beginner-friendly with simple strip piecing
-
Perfect for jelly rolls or stash busting
-
Visually striking with minimal complexity
-
Great for showcasing batik fabrics
Download the Free Pattern
You can access the complete step-by-step pattern, including diagrams and exact cutting measurements here:
The Tonga Focus Quilt Pattern is a beautiful example of how simple strip piecing can create something truly extraordinary. With its flowing design and endless color possibilities, this quilt is both relaxing to make and stunning to display. Whether you follow the original layout or experiment with your own palette, this project is sure to become one of your favorites.