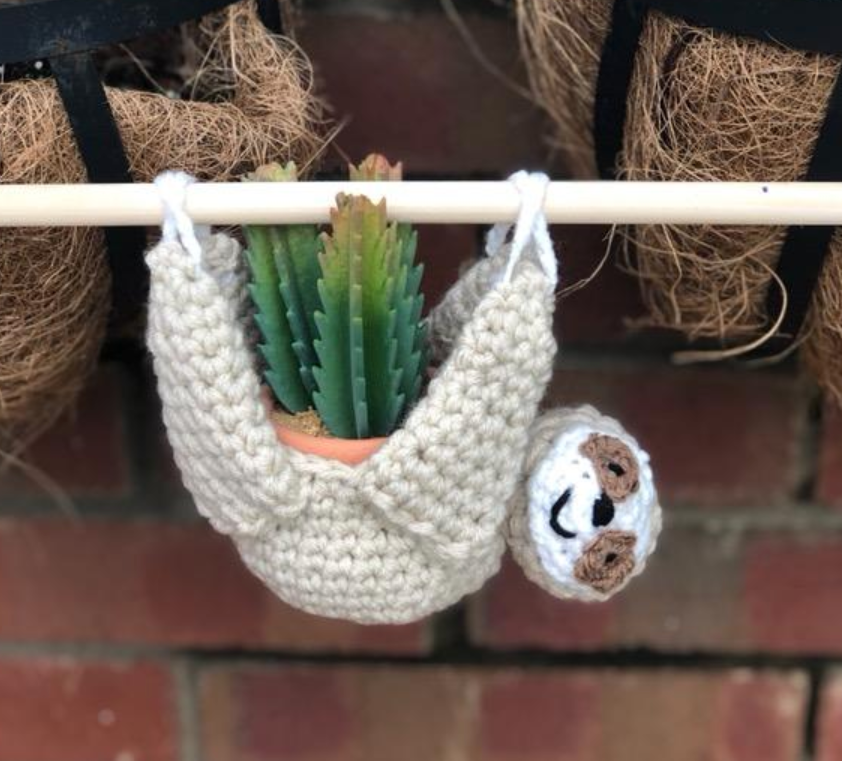
Instructions
Body
Using I hook and light brown yarn (2 strands held together):
Round 1: Magic Ring with 6 single crochets (sc) (6 sts), place stitch marker in the first stitch.
Round 2: 2 sc in each stitch around (12 sts).
Round 3: 2 sc in the first stitch, 1 sc in the next stitch, repeat around (18 sts).
Round 6-12: 1 sc in each stitch around (30 sts).
Fasten off and weave in ends. Set aside.
Head: Using I hook and light brown yarn (2 strands held together): Round 1: Magic Ring with 6 single crochets (sc) (6 sts), place stitch marker in the first stitch.
Round 2: 2 sc in each stitch around (12 sts).
Round 3: 2 sc in the first stitch, 1 sc in the next stitch, repeat around (18 sts).
Round 4: 2 sc in the first stitch, 1 sc in the next 2 stitches, repeat around (24 sts).
Round 5: 1 sc in each stitch around (24 sts).
Round 6: sc2tog in the first 2 stitches, 1 sc in the next stitch, repeat around (18 sts).
Round 7: sc2tog in the first 2 stitches, 1 sc in the next stitch, repeat around (12 sts).
Start stuffing with Poly-Fill.
Round 8: sc2tog 6 times (6 sts).
Fasten off, leaving long tails for sewing the head to the body.
Face
Using I hook and white yarn (1 strand):
Round 1: Magic Ring with 6 sc (6 sts), place stitch marker in the first stitch.
Round 2: 2 sc in next stitch, sc in next stitch, 2 sc in next stitch, sc in next 6 stitches, 2 sc in next stitch, sc in next stitch, 2 sc in next stitch, sc in next 2 (20 sts).
Fasten off, leaving a long tail for sewing the face to the head (do not attach to the head yet).
Eyes (make 2)
Using I hook and dark brown yarn (1 strand):
Chain 4, sc in 2nd chain from hook and in remaining 2 stitches.
Fasten off, leaving a long tail for sewing onto the face. Use the picture to determine the placement of the eyes.
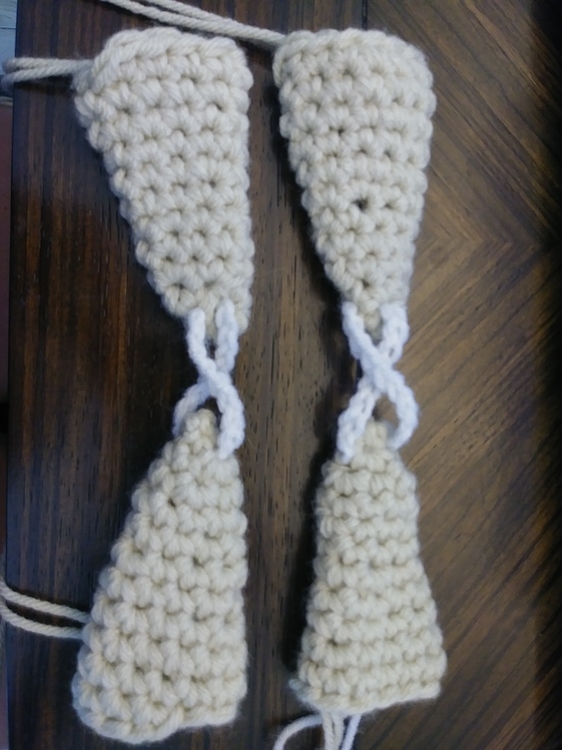
Arms (make 4)
Using I hook and light brown yarn (2 strands held together):
Round 1: Magic Ring with 2 sc (2 sts), place stitch marker in the first stitch.
Round 2: 2 sc in each stitch (4 sts).
Round 3: 2 sc in the first stitch, 1 sc in the next stitch, repeat around (6 sts).
Round 4: 2 sc in the first stitch, 1 sc in the next 2 stitches, repeat around (8 sts).
Rounds 5-7: 1 sc in each stitch around (8 sts).
Fasten off, leaving a long tail for attaching the arms to the body.
Fingers (make 4)
Using I hook and white yarn (1 strand):
Leave a 3-inch tail at the beginning and chain 10.
Fasten off, leaving another 3-inch tail for attaching to the arms.
Assembly
- Attach the Eyes: Sew the dark brown eyes to the white face.
- Embroider the Face: Use black yarn to embroider the nose, sleepy eyes, and mouth.
- Attach the Face to the Head: Sew the completed white face to the light brown head.
- Attach the Head to the Body: Sew the head to the body at Round 11 of the body.
- Attach the Fingers to the Arms: Thread 2 ends of the long white tails from the fingers to the small ends of the light brown arms. Tie a knot, hide the tails inside the arms.
- Attach the Arms to the Body: Attach the light brown arms to the body, using a picture for reference if necessary.
- Hang the Sloth: Slip the completed sloth onto the ½” dowel rod. Insert your plant into the sloth’s arms and enjoy!
This Sloth Plant Hanger is both a fun and functional way to display your plants. Whether you’re making it for yourself or as a gift, it’s sure to bring a smile to any space. Have fun crocheting your own sloth, and don’t forget to share your finished projects!