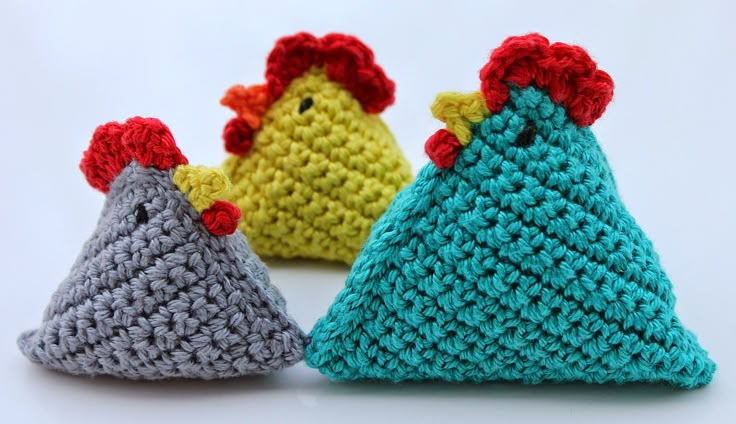
There’s something undeniably charming about handmade décor—especially when it involves crochet! Whether you’re looking to add a touch of whimsy to your kitchen, create adorable Easter decorations, or simply want to try something new and fun, this crochet chicken pattern is a perfect project. It’s quick, beginner-friendly, and a fantastic way to use up yarn scraps.
This beautiful little crochet chicken is made using simple stitches and just a few supplies you likely already have on hand. You’ll only need three colors of yarn for the body, crest, and beak, plus a little black yarn for the eyes. The stuffing? You’ll be using rice, which gives the chicken a nice weight and a cozy, natural feel—perfect for sitting on shelves or nestled in baskets.
In this tutorial, we’ll walk you step-by-step through the process, from crocheting the body to adding the tiny finishing details that bring this chicken to life. You don’t need to be an expert—just a crochet hook, some yarn, and a little patience. Let’s get started!
🧶 What You’ll Need:
-
3 colors of wool or cotton yarn:
-
A for the body
-
B for the crest and dewlap
-
C for the beak
-
-
A bit of black yarn for the eyes
-
A crochet hook suitable for your yarn (or slightly smaller for a tighter weave)
-
A tapestry needle
-
A pair of scissors
-
A row counter (optional but helpful)
-
Rice for stuffing
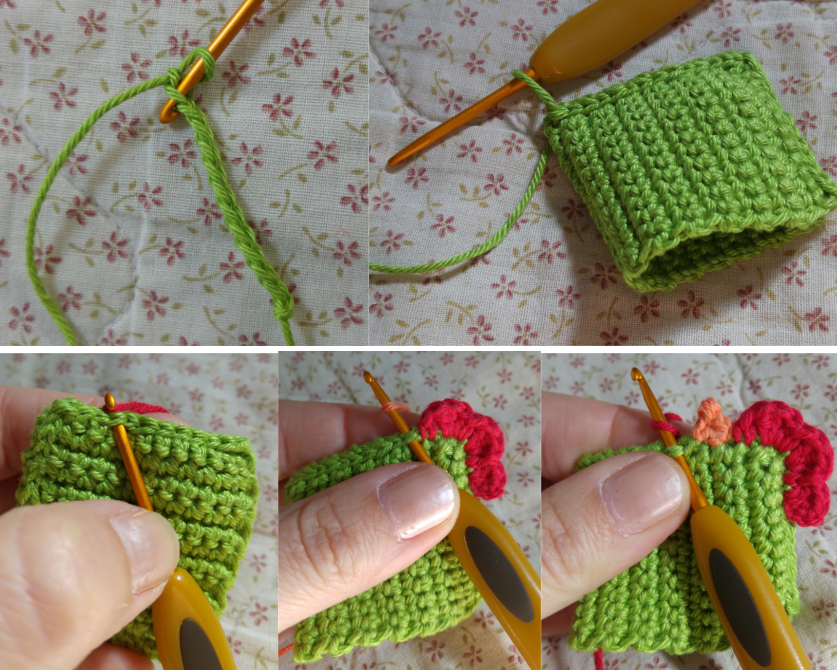
Crochet the Body
Start by making the rectangular base of the chicken’s body.
With color A:
-
Ch. 13 (17) depending on the size you want.
Row 1: Work 1 single crochet in each chain, starting from the 2nd ch from the hook. Turn.
→ 12 (16) stitches.
Row 2: Ch. 1, then 1 single crochet in each stitch. Turn.
→ 12 (16) stitches.
Rows 3 to 28 (38): Repeat Row 2 for a total of 28 (38) rows.
Now fold the piece in half and join the long edges (the sides opposite the fold) using slip stitches. Continue slip stitching along one short edge as well, but leave the last short edge open.
🐓 Add the Head Details
Let’s make the crest, beak, and dewlap to bring your chicken’s face to life!
Crest (Color B): Insert yarn B into the 4th slip stitch from the corner. In that same stitch: ch. 3, 2 double crochets. In the next stitch: 1 single crochet. Then repeat [3 double crochets in the next stitch, 1 single crochet in the next] two times. Finish with 1 single crochet in the last stitch. Fasten off and weave in ends.
Beak (Color C): Insert yarn C into the next stitch. In that stitch: ch. 1, 1 single crochet. Then ch. 3, and in the chain furthest from the hook, work 1 single crochet. In the next stitch: 1 single crochet + 1 slip stitch. Fasten off and weave in ends.
Dewlap (Color B again): Skip a stitch and insert yarn B. In that same stitch: ch. 1, 1 half double crochet, ch. 1, 1 slip stitch. Fasten off and hide the threads
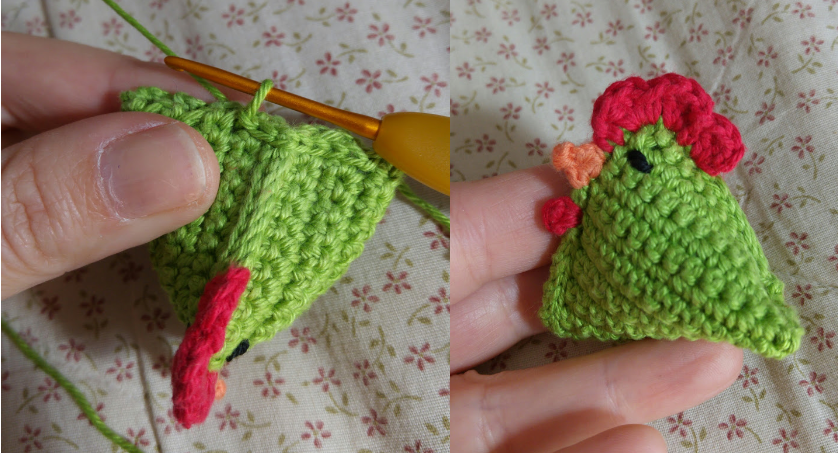
👀 Add the Eyes
Using a tapestry needle and a bit of black yarn, stitch two small eyes above the beak. You can make simple knots or tiny French knots for extra cuteness.
🌀 Stuffing & Shaping
-
Fill the body with rice. Press it down well so the chicken takes shape.
-
Fold the open edge in the opposite direction (to form a triangle like a berlingot or pyramid).
-
Close this final edge with slip stitches.
-
Fasten off and weave in the last threads.
🧡 Done!
Your beautiful crochet chicken is ready to display! These little birds make wonderful handmade gifts, charming spring decorations, or even cute pincushions.
Try making a whole flock in different colors!