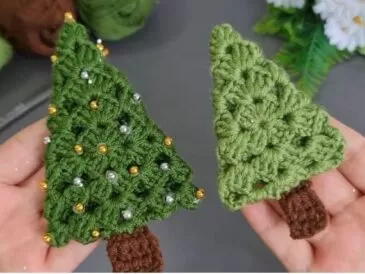
If you’re looking for a quick and festive project to add a handmade touch to your holiday décor, this crochet Christmas tree is perfect! It’s an easy, beginner-friendly pattern that takes just about 15 minutes to make. You can use it as an ornament, a table decoration, or even attach it to greeting cards or gift wraps.
With only basic stitches and a few simple folds, you’ll create an adorable mini Christmas tree decorated with pearl beads a beautiful way to bring cozy charm to your festive season.
Skill Level
Beginner

Materials
-
Acrylic DK yarn
-
4 mm crochet hook
-
Ten 8 mm pearl beads
-
Scissors
-
2 darning needles (1 large, 1 small)
Size: With the yarn and hook listed, your tree will measure approximately 5″ tall and 2.5″ wide at its widest point.
Yarn Alternatives: You can use any DK, #3, or 8-ply yarn for this project.
Stitches and Abbreviations
-
Ch = Chain
-
Hdc = Half double crochet
-
“ = Inches
Pattern Notes
-
The tree is created from a simple crocheted ribbon (strip) that is folded to form the triangular tree shape.
-
The pattern is worked in rows, using regular stitch placement unless otherwise stated.
-
Stitch counts are shown in brackets [ ] at the end of each row.
Crochet Pattern
Row 1:
Chain 59. Starting from the 3rd chain from your hook, work 1 half double crochet (hdc) in each stitch across. [57]
Fasten off and weave in both ends.
You now have a long crocheted ribbon that will form your Christmas tree.
Assembly Instructions
-
Form the Tree Shape
Take one end of your crocheted ribbon and make a 2-inch fold — this forms the base of the tree.
Continue folding the ribbon back and forth, making each fold slightly shorter than the one below it. You should end up with 6 folds, gradually tapering upward to form a triangle shape. -
Secure the Folds
Using your large darning needle, pierce through the tree from the bottom up. This will hold all the layers (folds) together. -
Add Beads and Hanging Loop
-
Cut a piece of yarn about 20 inches long and fold it in half.
-
Tie a knot approximately 1 inch from the folded end — this creates a small loop for hanging your ornament.
-
Thread the small darning needle onto the other end of the yarn.
-
String one pearl bead onto the needle, then thread it through the center of your folded tree.
-
Continue adding pearls and ribbon sections in alternating order: ribbon → pearl → ribbon → pearl, all the way up.
-
-
Decorate the Base
For a fuller, balanced look, add three pearls at the base of the tree.
Tie a small knot underneath to secure the beads, and trim any excess yarn, leaving a short tail.
Finishing Touches
You can lightly shape your tree with your fingers, ensuring the folds stay in place. For extra sparkle, you can add a small star bead at the top or attach a ribbon bow. These mini trees look lovely hanging on the Christmas tree, as gift toppers, or displayed in a garland.
Final Thoughts
This Crochet Christmas Tree is one of those quick and satisfying projects you’ll love making over and over. It’s a great stash-buster and makes a thoughtful handmade gift for friends and family. Whether you crochet one or a dozen, they’re sure to bring warmth and festive cheer to your holiday décor.