Cushions are one of the best ways to add a personal, handmade touch to your home decor. Today, I’m excited to share a pattern that is both visually stunning and easy to follow: the Embossed Stitch Cushion. This crochet project is perfect for intermediate crocheters looking to try a textured pattern that creates a beautiful 3D effect.
The embossed stitch is a crochet technique that uses front post double crochets (fpdc) and regular double crochets (dc) to create a raised, textured design. It’s great for giving your projects a luxurious, quilted look, which is why it’s perfect for a cushion cover!
Materials You’ll Need:
- Yarn: Choose a medium-weight (worsted) yarn. I recommend using cotton or acrylic for durability and softness.
- Hook Size: 5.0mm (H-8) crochet hook.
- Cushion Insert: 45 x 45 cm (18 x 18 inches).
- Tapestry Needle: For weaving in ends and assembling the cushion.
- Stitch Markers (Optional): Helpful to keep track of corners and pattern repeats.
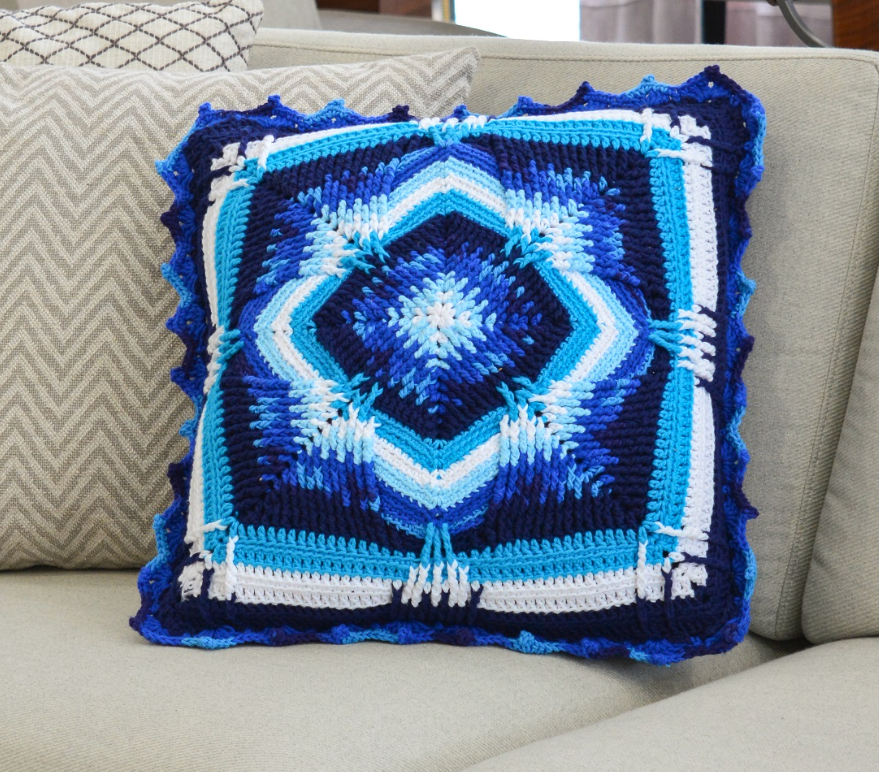
Size: 45 x 45 cm
Abbreviations:
- sc (Single Crochet)
- ch (Chain)
- sl st (Slip Stitch)
- row (Row)
- dc (Double Crochet)
- fpdc (Front Post Double Crochet)
Instructions:
Front Side With white yarn, start with a magic ring.
1st row: Start with 5 ch. 1 dc; 1 ch of space; 1 dc, 2 ch, 1 dc; 1 ch of space repeat from * to * 2 more times. Close with sl st. 2nd row: Move with 1 sl st, start with 6 ch, 1 dc in the same base stitch; 1 ch of space; 1 dc over the ch space; 1 ch of space; 1 dc, 3 ch, 1 dc in the same base stitch; 1 ch of space; 1 dc over the ch space; 1 ch of space repeat from * to * 2 more times. Close with sl st. Fasten off the yarn.
3rd row: Attach Candy Blue yarn to one of the corners; start with 6 ch, 1 dc in the same base stitch; 1 ch of space; 1 fpdc around the dc from the 1st row; 1 ch of space; 1 fpdc around the dc from the 1st row; 1 ch of space; 1 dc, 3 ch, 1 dc in the same base stitch; 1 ch of space; 1 fpdc around the dc from the 1st row; 1 ch of space; 1 fpdc around the dc from the 1st row; 1 ch of space repeat from * to * 2 more times. Close with sl st. Continue following Chart 1, working in circular rows and making the appropriate color changes. Close with sl st. Fasten off the yarn.
Back Side Attach Deep Indigo yarn to one of the corners of Chart 1. Rows 1 to 3: Start with 5 ch, skip 2 stitches; 1 dc, 2 ch, skip 2 stitches repeat from * to * 29 more times. Fasten off the yarn. Rows 4 to 29: Attach Bic Blue yarn, start with 5 ch, skip 2 stitches; 1 dc, 2 ch, skip 2 stitches repeat from * to * 29 more times. Fasten off the yarn.
Rows 30 to 33: Attach Deep Indigo yarn, start with 5 ch, skip 2 stitches; 1 dc, 2 ch, skip 2 stitches repeat from * to * 29 more times. Fasten off the yarn.
Edging Attach Deep Indigo yarn to one of the corners. Work by joining the front part with the back part. 1st row: Start with 1 ch; 1 sc, 4 ch, skip 2 stitches repeat from * to * for 3 sides; insert the pillow filling; finish joining the 4th side. Close with sl st. Fasten off the yarn.
2nd row: Attach Bic Blue yarn to one of the corners. Start with 1 ch; 1 sc, in the next ch space make 3 dc, 2 ch, 3 dc repeat from * to * until the end of the row. Close with sl st. Fasten off the yarn. Continue following Chart 3, working in circular rows and making the appropriate color changes. Close with sl st. Fasten off the yarn.
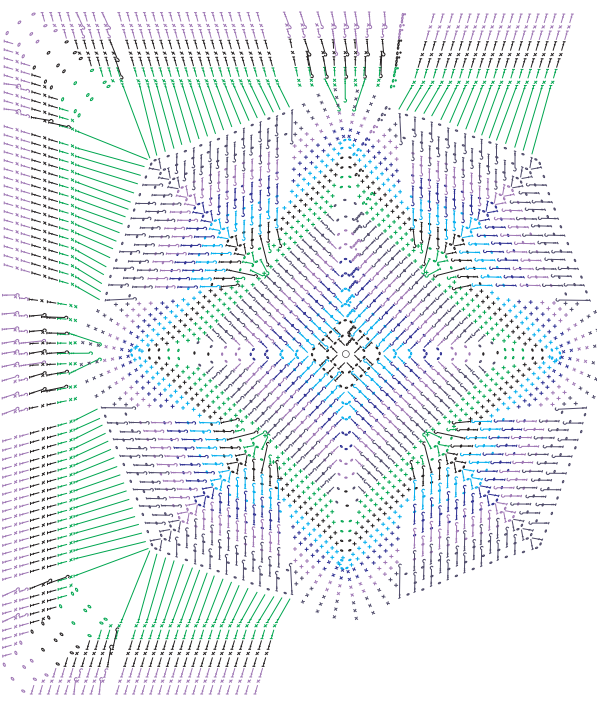
The Embossed Stitch Cushion is a stylish and cozy addition to any home, and the textured stitch gives it a sophisticated, handcrafted look. Whether you’re making it for your living room or as a gift, this cushion is sure to impress. Plus, the versatile embossed stitch can be used in many other crochet projects like blankets or bags!
Give this pattern a try and experiment with colors and textures to make it truly your own. Happy crocheting!

