There’s something timeless and heartfelt about handmade bookmarks, especially when they carry a symbolic design like a cross. Whether you’re making a keepsake for a loved one, a thoughtful gift for a church group, or a personal project to tuck inside your favorite devotional, a cross stitch crochet bookmark blends beauty with purpose. It’s a small piece that speaks volumes, stitched with care and meaning.
This delicate cross stitch bookmark is made using fine thread and a small hook, giving it that elegant lace-like finish that feels both vintage and classic. Don’t be intimidated by the intricate look—the pattern is surprisingly beginner-friendly once you understand the basic stitch repeats. Plus, it works up quickly, making it perfect for gifting or adding to your craft fair table.
What’s especially lovely about this pattern is how customizable it is. You can change the size slightly by adjusting your hook or thread, or you can add little embellishments like tassels, beads, or even a charm at the base. And since it doesn’t take much material, it’s also a great way to use up small scraps of crochet thread from your stash.

Suggested Materials: Fine cotton thread (size 10) Crochet hook (1.5 mm – 2 mm)
🔹 Center of the Cross
(Start with a magic ring or a small ring of chains)
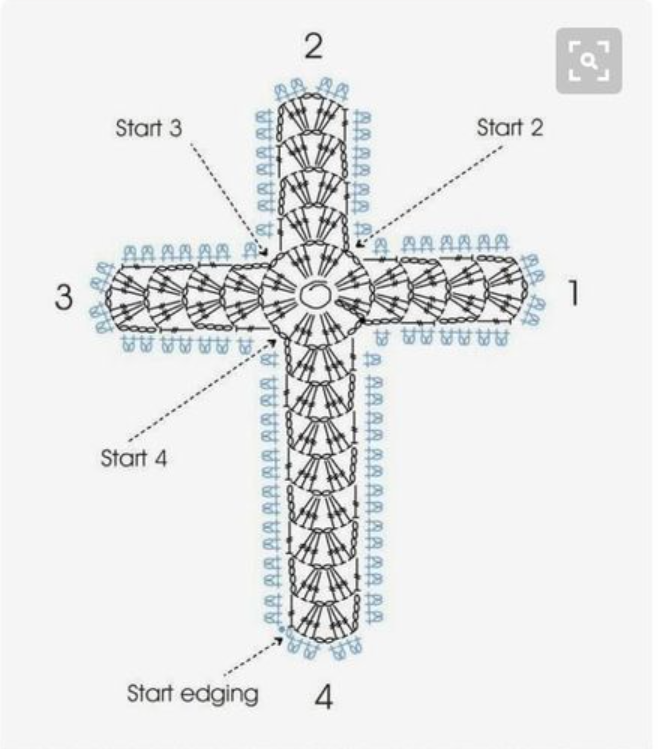
Centre: Chain 4 and join with a slip stitch to form a ring. Chain 3 (counts as first dc), then make 15 double crochets into the ring (total of 16 dc). Join with a slip stitch to the 3rd chain.
Part 1 – Right Arm of the Cross Start 1: Chain 3 (counts as 1 dc), then make 2 more dc in the same stitch. Chain 2, skip 2 stitches, and in the next stitch work 3 dc. Repeat until you have 4 blocks of 3 dc with 2 chains between each. Finish with a dc in the next stitch to complete the right side of the cross.
🔹 Part 2 – Top of the Cross Start 2: Join yarn at the top center stitch of the ring. Chain 3, make 2 dc in the same stitch. Work 4 blocks of 3 dc with 2 chains between, just like in Part 1.
🔹 Part 3 – Left Arm of the Cross Start 3: Join yarn on the opposite side of Part 1. Repeat the same pattern: 4 blocks of 3 dc with 2 chains in between.
🔹 Part 4 – Bottom of the Cross Start 4: Join yarn to the bottom center of the ring. Repeat: 4 blocks of 3 dc with 2 chains between each.
✨ Edging – Border Start edging: Work around the entire cross using single crochet stitches and picots (picot = ch 3, sl st in first ch). In the corners and chain spaces, make 1 sc, 1 picot, and continue evenly around.
Final Tip: Blocking the piece after finishing will help it hold its shape and look more polished. You can also add a tassel or chain fringe at the bottom to turn it into a beautiful bookmark.


