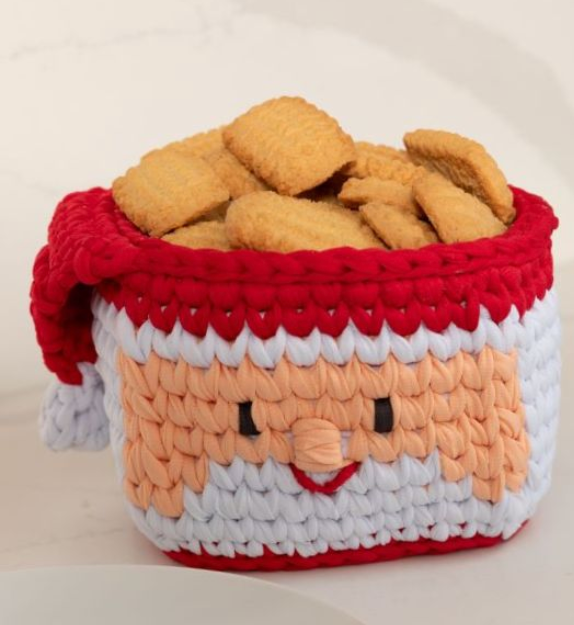
Welcome to Easy Crafts Patterns! With the holiday season just around the corner, there’s no better time to bring a little festive flair into your crochet projects. The Crochet Santa Basket is the perfect blend of fun and practicality. Whether you use it to store sweet treats, holiday trinkets, or even as a charming centerpiece, this basket is sure to add a touch of handmade magic to your celebrations.
This project is beginner-friendly, with simple stitches and clear instructions, making it a great choice for those looking to try their hand at holiday-themed crochet. It’s also a fantastic way to bring a personal touch to your home décor or give a thoughtful handmade gift to loved ones.
Get your yarn and hook ready, and let’s dive into creating this adorable and functional Santa Basket! Follow the step-by-step instructions below to craft a festive masterpiece that will spread joy throughout the season.
To ensure a smooth crochet experience, familiarize yourself with the following stitches and abbreviations:
Abbreviations: p. (Stitch), sts. (Stitches), tr. (Work), gr. (Needle), rep. (Repeat), rem. (Bind off), ch. (Chain), sl. (Slip Stitch), row (Row), yr. (Yarn Over), sc. (Single Crochet), inc. (Triple Increase), dc. (Double Crochet), d.f.j. (Double Crochets Closed Together).
Stitches Used: ch. (Chain) sl. (Slip Stitch) sc (Single Crochet) inc (Triple Increase with 3 single crochets centered on the same base stitch) dc (Double Crochet) f.a.f.j. (Closed Double Crochets Together) Magic Ring Invisible Row Closing: (A seamless finishing method described in detail below.)
Finished Size Width: 14 cm Height: 12cm
execution
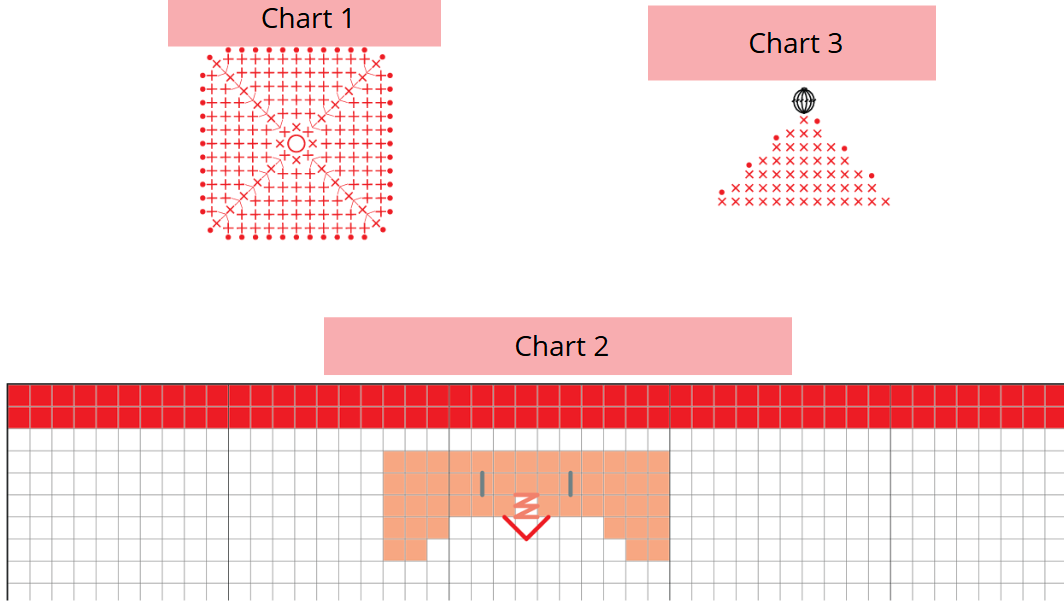
Chart 1 – Basket Base (Background) Begin with a Magic Ring using Carmine yarn. Work in circular rows, closing each row with an Invisible Row Closing for a neat finish.
1st row: Inside the ring, work 8 sc. 2nd row: (1 sc, 1 inc.) x4 (16 sts). 3rd row: 2 sc, (1 inc., 3 sc.) x3, 1 inc., 1 sc (24 sts). Continue following Chart 1, increasing as needed until completing the 6th row. 7th row: Work 1 sc in the back loop of each base stitch. Fasten off and set the yarn aside.
Chart 2 – Basket Side The basket sides use the guided yarn technique, allowing for seamless color changes.
Attach White yarn. 1st row: Work 48 sc around the last row of the base. 2nd row: 48 sc over the base row.
Introduce Pink-Love yarn for color detailing. 3rd row: Follow the pattern: 18 sc in White, 2 sc in Pink-Love, 9 sc in White, 2 sc in Pink-Love, 17 sc in White (48 sts). Continue following Chart 2, adjusting colors as indicated. Fasten off all yarns after completion.
Learn how to make Christmas here
Chart 3 – Santa Hat Attach Carmine yarn on the right side of the basket, aligning Santa’s face with the front.
Work in rows back and forth: 1st row: 13 sc. 2nd row: 1 dec, 11 sc. 3rd row: 1 dec, 9 sc. Follow Chart 3 to shape the hat, incorporating appropriate color changes.
Chart 4 – Basket Rim Attach Carmine yarn to the basket’s upper edge. 1st row: Work 1 sc into each base stitch around the entire top edge of the basket. Fasten off and secure the yarn.
Embroidery Details Eyes: Use Resin Gray thread. Nose: Use Love Pink thread. Mouth: Split Carmine thread in half and embroidery according to Chart 2.
Your Crochet Santa Basket is now complete! This delightful creation is sure to bring festive cheer to your home or serve as a thoughtful handmade gift. Share your finished project with us we’d love to see your unique spin on this classic design. Happy Crocheting! 🎅

