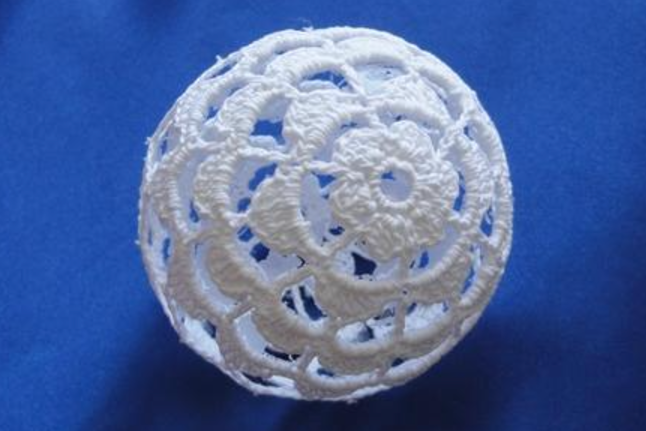
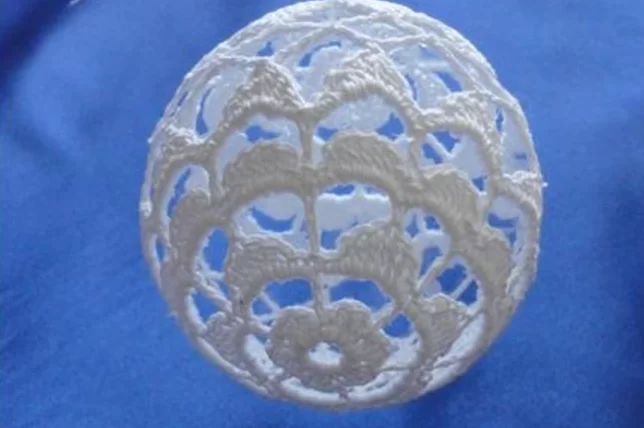
Welcome to Easy Crafts Patterns! The holiday season is the perfect time to add a touch of handmade charm to your home decor. This Crochet Christmas Tree Ball is a delightful project that combines traditional crochet techniques with festive elegance. Whether you’re an experienced crocheter or a beginner looking for a creative challenge, this pattern is a wonderful way to create a unique and personalized ornament for your Christmas tree.
With its delicate snowflake-like design and intricate arches and petals, this crochet ball is sure to become a cherished part of your holiday decor. Let’s dive into the step-by-step instructions to craft this stunning piece!
Materials Needed: Cotton crochet thread (size of your choice, white or festive colors) Crochet hook suitable for your thread size Scissors Needle for sewing Starching solution (optional for stiffening)
Crochet Pattern: Half of the Ball
Follow these steps to crochet one half of the ball. You’ll need to complete two halves and then join them together.
Step 1: Foundation Ring Chain 6 (ch6), then join with a slip stitch to form a ring.
Step 2: Create Base Circle Crochet 12 single crochets (sc) into the ring.
Step 3: Start Forming Snowflake-Like Design Chain 1 for height. Work the following sequence: In the same stitch as the previous row, crochet 1 sc, 1 ch, 2 sc, 1 ch, 1 sc. In the next stitch, work a slip stitch. Repeat this sequence 6 times to complete the row.
Step 4: Create Arches Chain 3 for height (counts as a single crochet). Chain 5 more for the arch. Work the following sequence: 1 double crochet (dc) into the slip stitch of the previous row, then chain 5. Repeat this sequence 5 times to form 6 arches. Join with a slip stitch to close the row.
Step 5: Add Petals Chain 1 for height. In each arch, crochet: 1 dc, 1 ch, 1 dc, 3 dc, 1 dc, 1 ch, 1 dc. Work a slip stitch in the double crochet of the previous row. Repeat 6 times to complete the snowflake petals and close the row.
Step 6: Expand to 12 Arches Chain 4 (counts as triple treble crochet). Work the following sequence: Chain 5, single crochet into the second triple treble of the previous row, chain 5, triple treble crochet in the slip stitch. Repeat 5 more times, then chain 5 and join with a slip stitch.
Step 7: Create Larger Petals Chain 1 for height. In each arch, work: 2 sc, 1 ch, 1 sc, 3 sc, 1 sc, 1 ch, 2 sc. Work a slip stitch in the single or double crochet of the previous row. Repeat 12 times, creating 12 petals to close the row.
Step 8: Final Arches Chain 4 (acts as treble crochet). Work the following sequence: Chain 7, treble crochet into the slip stitch of the previous row. Repeat 11 more times, then chain 7 and close with a slip stitch.
access free crochet pattern here
Step 9: Final Petals Chain 1 for height. In each arch, work: 2 sc, 1 ch, 1 sc, 3 sc, 1 sc, 1 ch, 2 sc. Repeat 12 times and close the row with a slip stitch.
Step 10: Joining for Assembly Using slip stitches, work into the second triple treble crochet of the previous row. Chain 7, then join with a slip stitch into the second triple treble crochet. Repeat 12 times to complete the edges.
Assembly:
Make Two Halves Crochet a second piece following the same instructions.
Starching (Optional): For a firmer shape, dip the halves into a starching solution, shape them over a round object (like a ball), and allow them to dry completely.
Sew Together: Align the edges of the two halves and sew them together carefully with a matching thread.