Crochet scarves with motif repetition are timeless, but this Birds Lace Scarf is truly something special. The delicate bird appliqués create a soft, flowing effect that resembles a sky full of flying swallows. Combined with ombré yarn transitions, the result is a scarf that is light, elegant, and perfect for any season.
In this article, you’ll find the full written pattern based on the diagrams, making it easy to follow even if you prefer text instructions over charts. This scarf is worked in motifs, giving you full control over length, colors, and layout. Let’s create this breathtaking scarf!
⭐ Materials
-
Fingering or sport-weight yarn (ideal para gradientes)
-
Color suggestions: blue ombré, sky tones, white, beige
-
Crochet hook: 2.0–3.0 mm
-
Scissors
-
Yarn needle
🧶 Stitches & Abbreviations (US Terms)
-
ch – chain
-
sl st – slip stitch
-
sc – single crochet
-
hdc – half double crochet
-
dc – double crochet
-
tr – treble crochet
-
dtr – double treble crochet
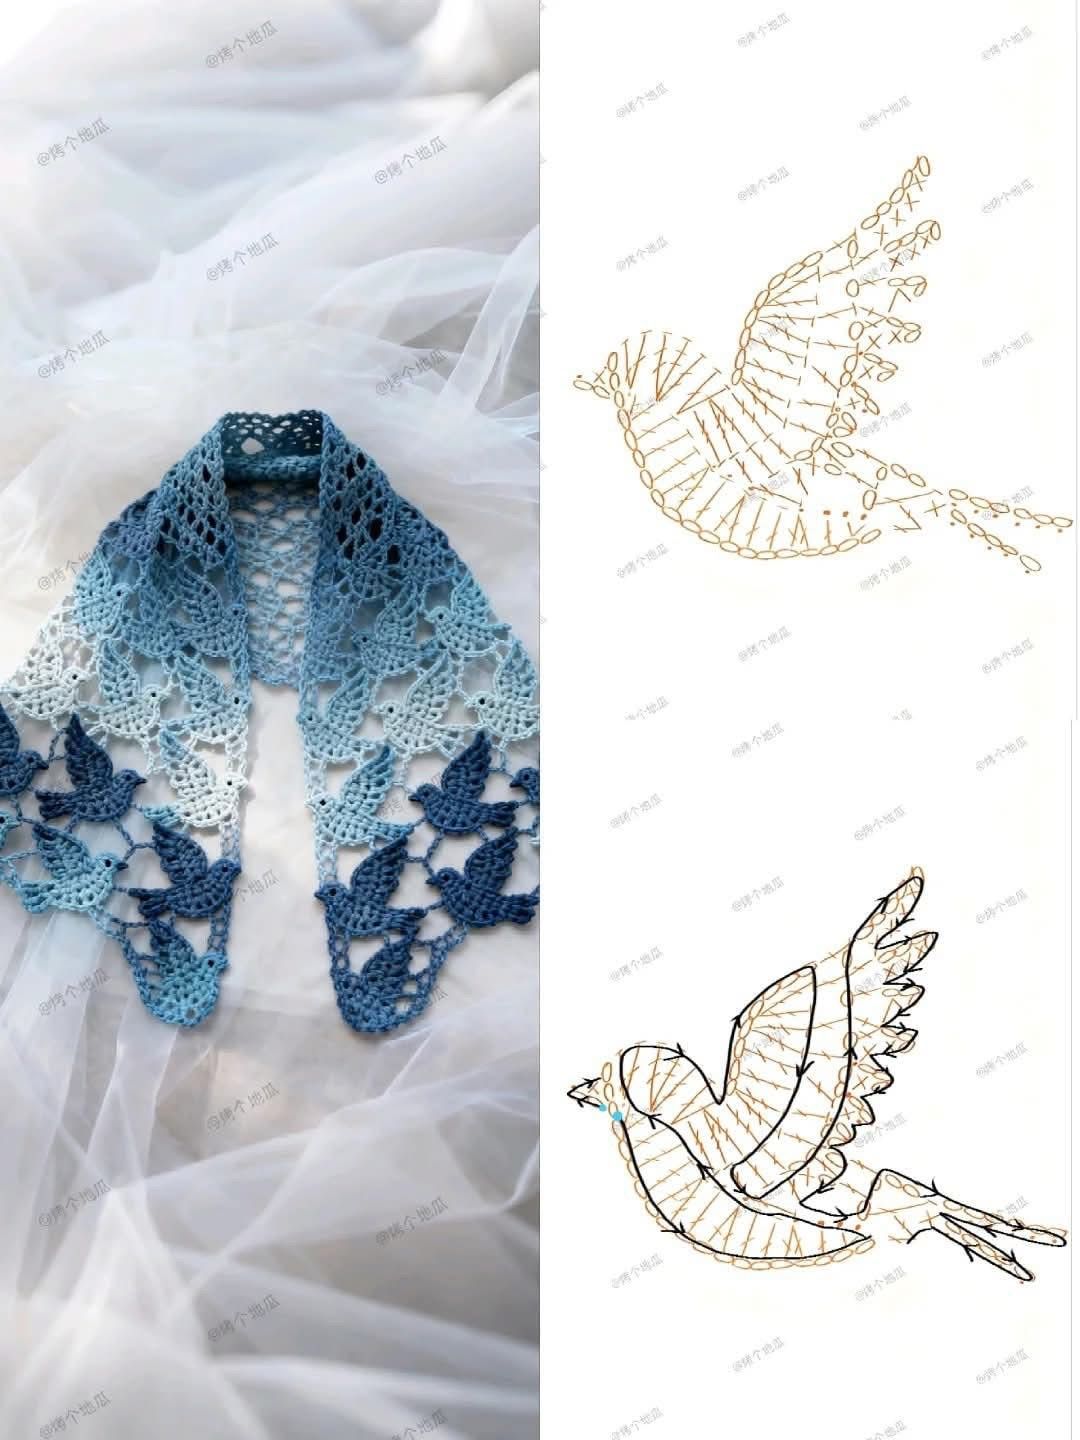
🕊️ Bird Motif – Written Pattern (Based on Diagram) Each bird is made separately and then sewn or attached to the lace mesh of the scarf.
1️⃣ Body of the Bird
Round 1 – Body Base
Magic ring.
Ch 3 (counts as dc), work 12 dc into the ring.
Join with sl st. (13 total)
Round 2 – Expanding the Body
Ch 3, dc in next 3 stitches, dc inc (2 dc in same stitch).
Repeat until reaching the shape indicated in the diagram.
The bottom of the bird is more rounded; the back has slight increases.
2️⃣ Wing (Upper Wing)
Attach yarn to the upper side of the body.
Row 1:
Ch 3, dc in next stitches forming a curve.
At the tip, ch 3 and sl st back into same stitch (creates the point of the wing).
Row 2:
Work along the previous stitches using: dc, tr, dtr according to height shown in the diagram.
This forms the spread wing effect.
Fasten off.
3️⃣ Lower Wing
Attach yarn slightly below the upper wing.
Work: dc, dc, tr following diagram height.
Finish with a small point at the end of the wing (ch 3, sl st).
4️⃣ Tail
Attach yarn at the back.
Work: ch 5, sc
Repeat 3–4 times to create the tapered feathers.
You may use tr/dtr for longer feathers.
5️⃣ Beak & Eye
-
Beak: ch 2, sc
-
Eye: a French knot or tiny embroidered stitch
🌿 Mesh Base for the Scarf
The birds are attached to a triangular lace mesh, made in rows.
Mesh Pattern (simple repeat):
Row 1:
Ch 10, dc in 6th ch from hook.
Ch 5, dc along entire row.
Row 2:
Ch 5, dc on next dc from previous row,
Ch 5, dc across.
Repeat until the mesh reaches the width you want.
🧵 Assembly
-
Make several bird motifs in gradient shades.
-
Lay them in a diagonal or vertical sequence inside the mesh windows.
-
Sew lightly with matching yarn.
-
Block your scarf to open the lace and smooth the birds.
This creates the stunning “flying birds” effect seen in the photo.
🎨 Color Suggestions
-
Sky Blue + Navy (as shown in the image)
-
White + Light Grey for a winter effect
-
Pastel rainbow for a soft and dreamy look
-
Black birds over beige mesh for dramatic contrast
🎁 Perfect For
-
Spring outfits
-
Gifts
-
Craft fairs
-
Statement accessories
-
Elegant lightweight scarves