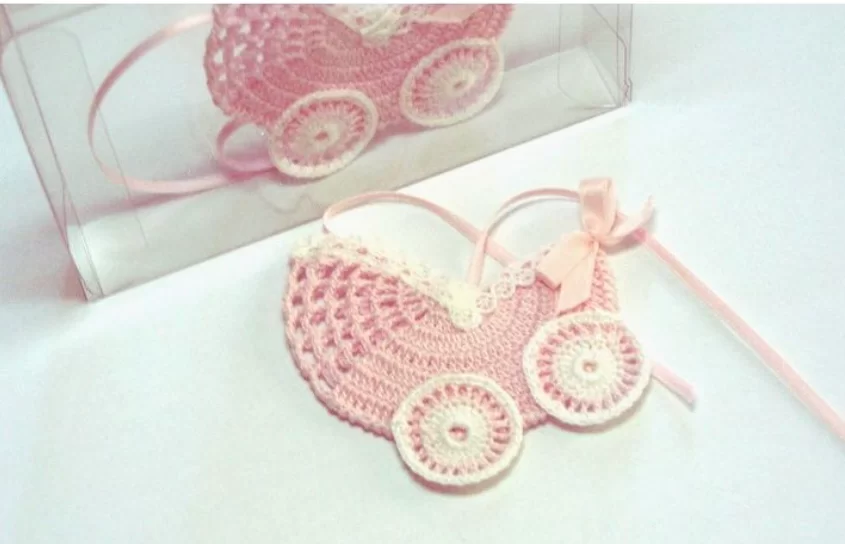
Are you looking for a cute, simple, and charming crochet embellishment for your baby projects? The crochet baby stroller applique is just what you need! This sweet and easy-to-make design can add a delightful touch to baby blankets, clothing, hats, and more. Whether you’re making a gift for a newborn or decorating something for your own little one, this crochet applique is sure to bring a smile to your face.
In this article, I will walk you through the steps to create this adorable baby stroller applique, perfect for adding a personal and handmade flair to your crochet projects. The design is beginner-friendly, but even experienced crocheters will enjoy making this little accessory.
Materials Needed: Double knitting yarn (recommended hook size: 4mm) Crochet hook (4mm) Yarn for the pram (baby colors such as pink, white, blue) Yarn needle
Step 1: Begin the Pram Base
Start with the Magic Ring: Create a magic ring. Chain 3 (this acts as the first double crochet). Work 32 more double crochets into the magic ring for a total of 33 double crochets.
Close the Magic Ring: Tighten the magic ring and join with a slip stitch in the third chain of the initial chain 3.
Step 2: Round 2 (Increase) Start with Chain 3 (counts as the first double crochet). Work two double crochets into the next double crochet, and repeat this pattern around. At the end of the round, join with a slip stitch in the top of the first chain 3. You should have a total of 41 double crochets by the end of Round 2.
Step 3: Round 3 (Shaping) Start with Chain 3 (counts as the first double crochet). In the next stitch, work two double crochets together, then add one more double crochet in the same stitch. Repeat this pattern around. After completing the round, join with a slip stitch in the top of the first chain 3.
Step 4: Shaping the Pram Fold the Circle: Bend the circle into the shape of the pram, with the yarn tail at the back side.
Step 5: Single Crochet Around the Pram Single Crochet Around the Pram’s Edge: Start at one end and make a single crochet into each double crochet, turning the pram into a small L-shape. Continue single crocheting around until you reach the corner. For the corner, make three single crochets.
Join with a Slip Stitch: After completing the round, join with a slip stitch to close.
Step 6: Adding the Frills (Optional) Single Crochet with Chain 3 Spaces: Chain 3, and in the next stitch, work a single crochet. Continue this pattern around, creating spaces between the single crochet stitches.
Step 7: Cut Yarn and Finish the Base Cut the yarn and hide the yarn tail by weaving it into the work using a yarn needle.
Step 8: Making the Wheels (Repeat for Two Wheels)
Magic Ring for the Wheel: Start with a magic ring and make 12 half double crochets inside the ring.
Round 2: Chain 4, then make a double crochet with a chain 1 space in each stitch around. Join with a slip stitch in the third chain of the initial chain 4.
Round 3: With a new color (white), join and single crochet into the stitches, making 2 single crochets into each chain space. Work around until the round is complete.
Join and Finish: Join with a slip stitch, cut the yarn, and weave in the ends. Repeat for the second wheel.
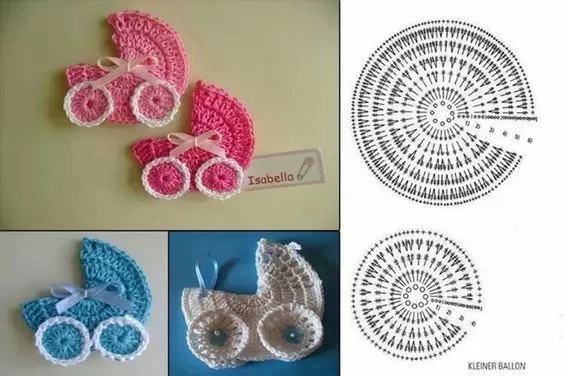
This tutorial guides you through creating the crochet pram along with its wheels. Feel free to adjust the yarn colors or the size based on your preferences!

