Special Stitches: Shell: (2 dc, ch 2, 2 dc) in indicated stitch.
Beginning Shell (Beg Shell): Ch 2 (counts as first dc), (dc, ch 2, 2 dc) in indicated stitch.
sc2tog: [Insert hook in next stitch, yarn over and pull up a loop] twice, yarn over and draw through all 3 loops on hook.
Materials: Color A and B yarn (choose your favorite soft and warm baby yarn)
Crochet hook suitable for your yarn weight
Yarn needle
Button for collar
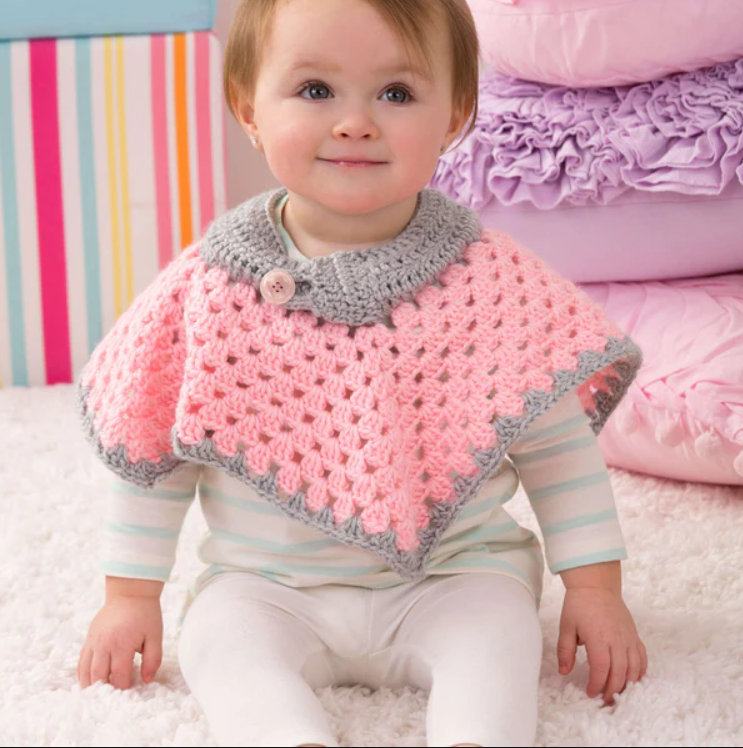
Notes: Poncho is made from the top down in joined rounds that form a square.
Collar is worked back and forth in rows around the inner edge of the square.
Instructions
Poncho
With A, ch 60 (72, 72, 84); taking care not to twist ch, join with slip st in first ch.
Round 1 (right side): Beg shell in same ch as joining, *[ch 1, skip next 2 ch, 3 dc in next ch] 4 (5, 5, 6) times, ch 1, skip next 2 ch, shell in next ch; repeat from * twice, [ch 1, skip next 2 ch, 3 dc in next ch] 4 (5, 5, 6) times, ch 1, skip next 2 ch; join with slip st in top of beginning ch—4 shells, 16 (20, 20, 24) 3-dc groups, and 20 (24, 24, 28) ch-1 sps.
Round 2: Slip st in first dc, slip st in first ch-2 space, beg shell in same ch-2 space, [*ch 1, 3 dc in next ch-1 space; repeat from * to next ch-2 space, ch 1, shell in next ch-2 space] 3 times, **ch 1, 3 dc in next ch-1 space; repeat from ** to beginning ch, ch 1; join with slip st in top of beginning ch—4 shells, 20 (24, 24, 28) 3-dc groups, and 24 (28, 28, 32) ch-1 sps.
Repeat Round 2 six (seven, nine, eleven) times—4 shells, 44 (52, 60, 72) 3-dc groups, and 48 (56, 64, 76) ch-1 sps.
Fasten off A.
Last Round
Join B with slip st in any ch-2 space, beg shell in same ch-2 space, [*ch 1, 3 dc in next ch-1 space; repeat from * to next ch-2 space, ch 1, shell in next ch-2 space] 3 times, **ch 1, 3 dc in next ch-1 space; repeat from ** to beginning ch, ch 1; join with slip st in top of beginning ch—4 shells and 48 (56, 64, 76) 3-dc groups.
Collar
Row 1 (right side): With right side facing and working in opposite side of foundation ch of Round 1, join B with slip st in ch of any shell, ch 2 (counts as first dc), 2 dc in same ch, * 2 dc in next ch-2 space, dc in next ch; repeat from * to last ch-2 space, 2 dc in last ch-2 space, turn—62 (74, 74, 86) dc.
Row 2: Ch 2, dc in each st across, turn.
Row 3: Ch 1, sc in first 5 (6, 6, 7) sts, sc2tog, *sc in next 4 (3, 4, 3) sts, sc2tog; repeat from * to last 1 (6, 6, 7) st(s), sc in last 1 (6, 6, 7) st(s), turn—52 (61, 63, 71) sts.
Row 4: Repeat Row 2.
Fasten off size 6 months only.
Sizes 12 months, 18 months, and 24 months only:
Row 5: Repeat Row 2.
Fasten off sizes 12 months and 18 months only.
Size 24 months only:
Row 6: Ch 1, sc in first 3 sts, sc2tog, *sc in next 7 sts, sc2tog; repeat from * to last 3 sts, sc in last 3 sts, turn—63 sc.
Row 7: Repeat Row 2. Fasten off.
Button Tab
Row 1 (right side): With right side facing and working in ends of rows, join B with slip st in last row of collar, ch 1, hdc in same row as joining, 6 (8, 8, 11) hdc evenly across ends of rows, dc in last ch-2 space of Row 1 of collar, turn—8 (10, 10, 13) sts.
Rows 2 and 3: Ch 1, hdc in each st across, turn.
Row 4: Ch 1, [sc2tog] 1 (2, 2, 2) time(s), sc in next st, ch 9, sc in next st (button loop made), [sc2tog] 2 (2, 2, 3 ) times—5 (6, 6, 7) sts and 1 button loop.
Row 5: Ch 1, skip first st, sc in each st to button loop, 12 sc in button loop, sc in remaining sts to last st, slip st in last st.
Fasten off.
Finishing
Weave in ends. Sew button on collar under button loop. Block if necessary.
Abbreviations
- A, B, C = Color A, Color B, etc.
- ch = chain
- dc = double crochet
- hdc = half double crochet
- sc = single crochet
- sp(s) = space(s)
- st(s) = stitch(es)
- ( ) = work directions in parentheses into same stitch
- [ ] = work directions in brackets the number of times specified
- * = repeat whatever follows the * as indicated


