Add a bright and cheerful touch to any window with this Flower Power Valance—a whimsical, colorful project that brings a retro flair and handmade charm to your home. Perfect for using up scrap yarn, this project is flexible, fun, and beginner-friendly once you’re comfortable with basic crochet techniques.
If you’re a fan of granny squares, motifs, or joining-as-you-go projects, you’ll love this free pattern. Let’s dive into the step-by-step process of making your own floral valance!
🧶 Stitches & Abbreviations DC = Double Crochet CH = Chain ST = Stitch SL ST = Slip Stitch Magic Ring = Google “How to Crochet a Magic Ring” if you’re new to it Join-As-You-Go = Google “Join as you go Crochet Method” for helpful tutorials
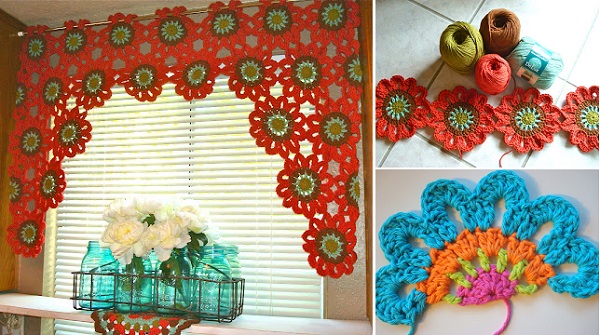
🧵 What You’ll Need Hook Size: US H (5.0 mm) Yarn: I used Sugar & Cream, Peaches & Creme, and other various cotton yarns from my stash in different colors.
Note: I can’t give you exact yardage because this is a perfect stash-busting project! Just grab your favorite colors and have fun mixing and matching.
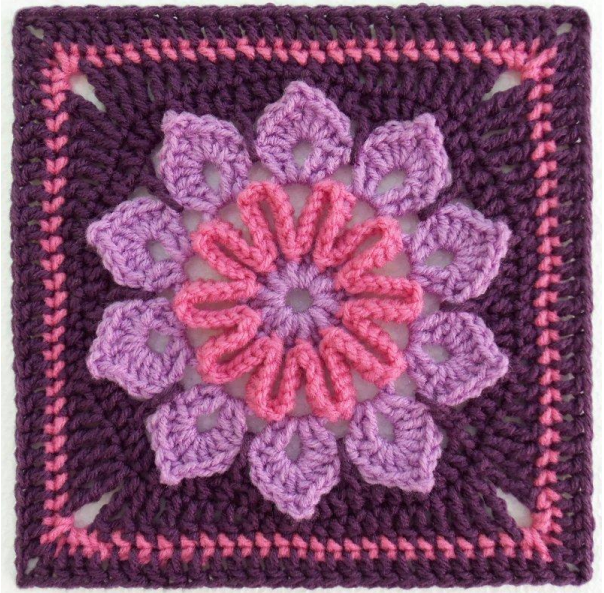
🌼 Full Flower Motif Instructions
You’ll be creating a series of full and half flowers to build your curtain panel. Each full flower follows this 5-row sequence:
🌸 Row 1 Make a magic ring. CH 3 (counts as first DC), work 11 DC into the ring. Join with SL ST to top of starting CH-3. You should have 12 stitches total. Fasten off if changing colors.
🌸 Row 2 Join new color in any DC. CH 4 (counts as DC + CH 1), then (DC, CH 1) in each ST around. Join with SL ST to 3rd CH of beginning CH 4. You’ll now have 12 DC and 12 CH-1 spaces. Do not fasten off if continuing with the same yarn.
🌸 Row 3 SL ST into the first CH-1 space. CH 3, 2 DC in the same space. Work 3 DC in each CH-1 space around. Join with SL ST to top of CH-3. Fasten off if changing colors. You should have 36 DC (12 clusters of 3).
🌸 Row 4 Join next color in any DC. CH 3, DC in same stitch, CH 4, Then: skip 1 DC, 2 DC in next ST, 2 DC in next ST, CH 4. Repeat from * to * around. Join with SL ST to 3rd CH of starting CH 3. You’ll now have 12 chain-4 spaces. Do not fasten off.
🌸 Row 5 In each CH-4 space: 8 DC. Skip 2 DC, SL ST in the middle (between the next 2 DC), skip 2 more DC, then 8 DC in next CH-4 space. Repeat around. SL ST to join and fasten off.
🔗 Joining Flowers
Use the Join-As-You-Go method during Row 5.
Join each new flower between the 4th and 5th DC of the 8 DC petal on the previous flower. This creates a seamless look and saves you from tons of sewing later!
Tip: See visual guides online if you’re unsure where exactly to join. Once you get the hang of it, it’s incredibly satisfying!
🏡 Valance Assembly Guide
This valance grows row by row using a mix of full and half flowers. Here’s how to lay it out:
🌼 Row 1: 8 Full Flowers
🌼 Row 2: Start with 1 Half Flower, then join 7 Full Flowers, end with 1 Half Flower.
Add the 7 full flowers first. Then go back and join half flowers into place on each end using the join-as-you-go method.
Note: These flowers are not directly aligned under the first row. Offset them slightly so the petals fill the spaces between flowers on the row above.
🌼 Row 3: 2 Full Flowers on each side
🌼 Row 4: 1 Half Flower and 1 Full Flower on each side
🌼 Row 5: 1 Full Flower on each side
🌈 Customization Ideas
-
Mix bold and pastel shades for a cheerful, boho vibe
-
Keep it monotone for a more subtle, elegant look
-
Add beads or tassels to the lower petals for a fun twist
-
Turn it into a table runner or wall hanging by changing the assembly layout
This Flower Power Valance is a fantastic way to practice motifs, color changes, and the join-as-you-go method all while making something beautiful and practical for your home. It’s a joyful crochet project that celebrates color, creativity, and the beauty of handmade décor.
Have questions or want to share your creation?
Tag us or leave a comment below—we love seeing your finished pieces!
Stay creative,
💐 Easy Crafts Patterns